22 June 2013

There are many posts comparing Mercurial and Git, but here are the top things I noticed recently when I used Mercurial for an extended amount of time. Before that, I had come from a Git background.

  • Git has a staging area and Mercurial doesn’t. In Mercurial, when you modify files already in a repo, they’re automatically added to the list of things that will be commited. In Git, you need to explicitly add these every time to the staging area.

  • Branches in Mercurial and Git are different in a few important ways:

    • Mercurial tracks global commits (which can be on different branches), but Git tracks branches and the isolated commits inside these branches.
    • So, when you pull or push a Mercurial repository, you implicitly pull/push all branches.
    • In Mercurial, you “close” branches instead of deleting them (and they can be re-opened later at any time by just committing to them again). In Git, you actually delete branches. For Mercurial, this is good in that it preserves history, but, arguably, it’s not as clean.
  • Git’s checkout is an overloaded, Swiss Army knife, whereas Mercurial splits things into hg branch, hg update, and hg revert.

  • The often-used git pull command combines two things (fetching and merging). In Mercurial, this shortcut command doesn’t really exist. You need to do hg pull and then an hg update. Though, you can do hg pull -u to achieve the same.

  • Mercurial does garbage collection on a repository automatically when certain commands are called. Git makes you do it explicitly. I heard some people from GitHub at a recent presentation say that they get support tickets sometimes for people asking GitHub to do a git gc for them to try and magically fix certain problems.

  • In Git, you can remove a stash/shelf with git stash drop, but it seems you can’t do this in Mercurial. Though, shelves are just stored as patches under .hg/shelves, so you can remove a file there to delete a shelf.

  • Mercurial is more lenient on the format used for the user name and the email settings, so things can, arguably, get messier in the commit log than with Git.

In the end, I actually enjoyed using Mercurial, and I can see where it’s perhaps better designed in several ways. However, the features of GitHub versus BitBucket outweigh a lot of these factors.


18 June 2013

Preface

I had worked with both Ruby’s RVM and rbenv a little, and setting up something similar for Python version and package management seemed a little undocumented, ambiguous, and generally quirky to me. Maybe doing this should not require a blog post, though the following was the simplest way for me to accomplish this.

Also, this post on the same topic was very helpful.

Python

I choose to leave OS X’s stock Python install alone, which was a slightly out-of-date version 2.7.2 for the system executable at /usr/bin/python. Also, the Python package manager easy_install comes with 10.8, but it’s deprecated.

So, I wanted to start with a base Python version that was more recent than the OS X stock Python. I did this using Homebrew:

brew install python

This installed version 2.7.5. Note that the Homebrew install of Python also includes Pip (the preferred Python package manager these days) as well as Distribute (a lower-level package management piece that Pip builds upon).

Global Packages

At this point, if I use Pip to install a package, it will be installed globally. In general, I want to only install packages into specific environments and leave the global package store alone. However, I still need a global package for virtualenv itself:

pip install virtualenv

I may have to install other global packages in the future, but the only package I’ve installed explicitly for now is virtualenv.

Setting Up Virtualenv

I created a ~/.virtualenvs folder where I will create all or most of my environments:

mkdir ~/.virtualenvs

For example, I can create a global environment for Python 2.7 packages, and a global environment for Python 3 packages. Note that I can also create project-specific environments if I want.

Then, I added the following default settings to my .bashrc file:

# virtualenv settings
export PIP_REQUIRE_VIRTUALENV=true # pip should only run if there is a virtualenv currently activated
export PIP_RESPECT_VIRTUALENV=true # tell pip to install packages into the active virtualenv environment
export VIRTUALENV_DISTRIBUTE=true  # tell virtualenv to use Distribute instead of legacy setuptools

The first setting is the most important. It tells pip to only run if inside a virtual environment. This keeps global packages untouched and stable, and it prevents a package from accidentally being installed globally when you mean to install it in a particular virtual environment. However, if global packages need to be installed/uninstalled/upgraded later, I’ll need to temporarily comment out and disable this setting.

Also note the VIRTUALENV_DISTRIBUTE option. This tells virtualenv to use the newer Distribute supporting library. From the official Python package page here: Distribute is a fork of the Setuptools project. Distribute is intended to replace Setuptools as the standard method for working with Python module distributions.

Now, we can create an environment and activate it:

cd ~/.virtualenvs
virtualenv default
. ~/.virtualenvs/default/bin/activate

With this environment active, any calls to the Python, Pip, etc. executables will pass through it, and packages will be installed to this environment.

Listing and Uninstalling Environments

Since I plan to create most environments in ~/.virtualenvs, I can just check that directory to see all installed environments. Likewise, to remove an environment, I can just remove the corresponding directory there.

Creating a Default Environment

To activate a default environment on login, I also added this to my .bashrc file:

# set a default virtualenv
. ~/.virtualenvs/default/bin/activate

Final Thoughts

Virtualenvwrapper

Virtualenvwrapper claims to ease several of the pain points and manual steps I described above, but I wanted to see if I could use virtualenv directly without adding another layer of tooling to learn.

Modifying the Shell

When you activate an environment, virtualenv modifies your prompt to indicate which environment you’re using. If this is undesirable, you can add the following line to your .bashrc file:

export VIRTUAL_ENV_DISABLE_PROMPT=true # tell virtualenv not to modify my prompt

If you disable this indicator in your prompt, you can check which environment you’re currently using by echoing the $VIRTUAL_ENV variable.

An Environment’s Bindings to a Python Executable

When a new environment is created, it is bound to the current system Python executable by default (whatever which python points to). In my case, this will be the Python 2 executable installed by Homebrew. You can, however, bind a new virtual environment to a particular Python executable by using the -p flag. For example, you could do virtualenv -p python3 foo-py3 to create a Python 3 environment or even virtualenv -p /usr/bin/python2.6 foo-py2.6 to call out a specific path to a Python executable.
31 May 2013

In my last post, I mentioned that you can still use try...catch blocks with .NET 4.5 async methods. There is some interesting magic that .NET injects for you under the covers in this case. For example, imagine you have the following (simplified and contrived) code which uses the newer .NET 4.5 SendAsync() method on UdpClient instead of the older, synchronous Send() version:

// Do something...

try
{
	var client = new UdpClient();
	client.SendAsync(datagram, datagram.Length, hostname, port);
}
catch (Exception e)
{
	// Handle exception here...
}

// Do something else...

Let’s assume that the host specified by hostname is down/invalid. The part about this flow that blew my mind was that the call to SendAsync() will return immediately (and not delay the code in // Do something else...), but the exception will still bubble up and be handled by the catch block. This post has an in depth explanation of how the compiler handles this. In the post, he mentions how you can even debug and step through code like this in Visual Studio, pass over an async method and see it return immediately, step through more code, and be jarringly brought back to the thrown exception from a method that has already returned!


28 May 2013

This post is just a note about a quick fix we did at work to remedy a brittle (and embarassing) dependency on StatsD. StatsD is a simple daemon that listens for and aggregates statistics sent over UDP and can be plugged into various reporting tools and dashboards. We make a lot of calls to StatsD in our app (measure anything, measure everything), so any problems doing so is central to performance.

One day, the our main web stack actually went down because our StatsD machine crashed and our app was inadvertently dependent on it. We rebooted the StatsD server and everything was up again, but we then immediately made it a priority to decouple our app from StatsD.

The problem was in how we were using the System.Net.Sockets.UdpClient class. We had a small utility wrapper class that, at its core, just used UdpClient.Send() to throw packets at StatsD. At first, I just tried wrapping the call to Send() in a try...catch block. When I tested this, though, I found that our app significantly slowed down. Why was this happening for something that sends UDP packets? Shouldn’t it be fire and forget?

I mistakenly took this method to work asynchronously. Send() actually seems to stall a bit when sending data (as it presumably establishes a connection), and even longer when it can’t reach the destination and throws an exception.

To fix this, I simply switched to using the SendAsync() method instead (which is new in .NET 4.5). I could have also used the older BeginSend() method if the project wasn’t up to 4.5.

Note that I still needed to wrap the call to SendAync() in a try...catch block in the (rare) case that our StatsD machine is down. More on that in my next post… Update 2013-05-31: See here for more detail on this.

In addition to not having a hard dependency on StatsD, we immediately noticed an increase in responsiveness in several central endpoints of our app as we’re now making all calls to StatsD aynchronously. Not our best moment, but we’ll take the easy wins wherever we can. :)


19 September 2011

I recently upgraded the hard drive in my laptop (a Western Digital Blue, 640GB) to an SSD (OCZ Vertex 3, 240GB). I’d heard how much an SSD improves performance, and I can now definitely vouch for this; the upgrade has been a substantial boost for my aging mid-2009 MacBook Pro (Intel Core 2 Duo 3.06GHz, 8 GB RAM).

During the course of the upgrade, I did a couple before and after benchmarks.

Boot Times

First, I took some very informal measurements of boot time. I routinely boot into Windows using Boot Camp for work, so I have boot times for both Windows 7 and OS X Lion.

Windows 7

  • From boot menu to desktop:
    • Before: 1:15
    • After: 0:29
  • To launch Firefox
    • Before: 2:13
    • After: 0:40

OS X Lion

  • From boot menu to desktop
    • Before: 1:12
    • After: 0:17 (17 seconds!!!)
  • To launching iTunes
    • Before: 1:44
    • After: 0:29

CrystalDiskMark

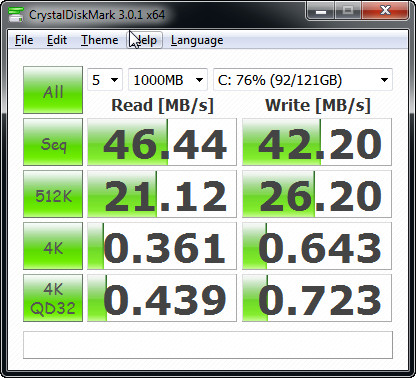
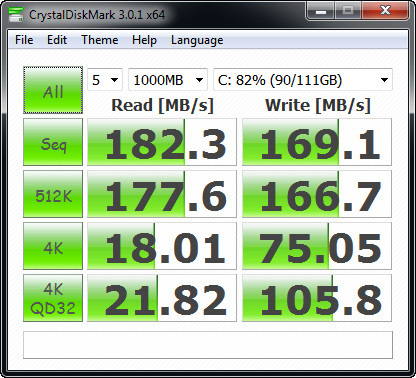
I also took before and after measurements using CrystalDiskMark (a disk benchmarking utility for Windows).

Before

CrystalDiskMark results, before

After

CrystalDiskMark results, after

Windows Experience Index

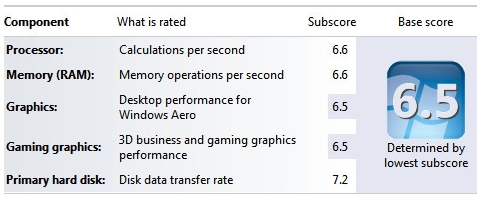
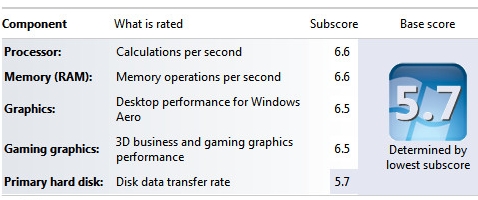
Lastly, here are the results from the Windows Experience Index utility on Windows 7.

Before

Windows Experience Index results, before

After

Windows Experience Index results, before